
Comment réparer les marques brûlées et floues ? Le guide ultime de dépannage de la gravure laser
Dans la fabrication industrielle de haute précision, l'écart entre un produit de marque haut de gamme et une pièce de rebut se mesure souvent en microns. Que vous exploitiez une chaîne de production B2B à haut volume ou un atelier spécialisé sur mesure, les fluctuations de qualité peuvent représenter un revers coûteux. C'est pourquoi une approche systématique du dépannage de la gravure laser devient l'atout le plus précieux de votre boîte à outils technique.
La cohérence ne concerne pas seulement le matériel ; il s'agit de maîtriser les variables de la lumière, du matériau et du mouvement. Dans ce guide, nous disséquons les quatre principaux tueurs de qualité – les marques de brûlure, le flou, la profondeur incohérente et la distorsion géométrique – en utilisant un cadre rigoureux pour améliorer votre Gravure laser Contrôle de la qualité.
Table des matières
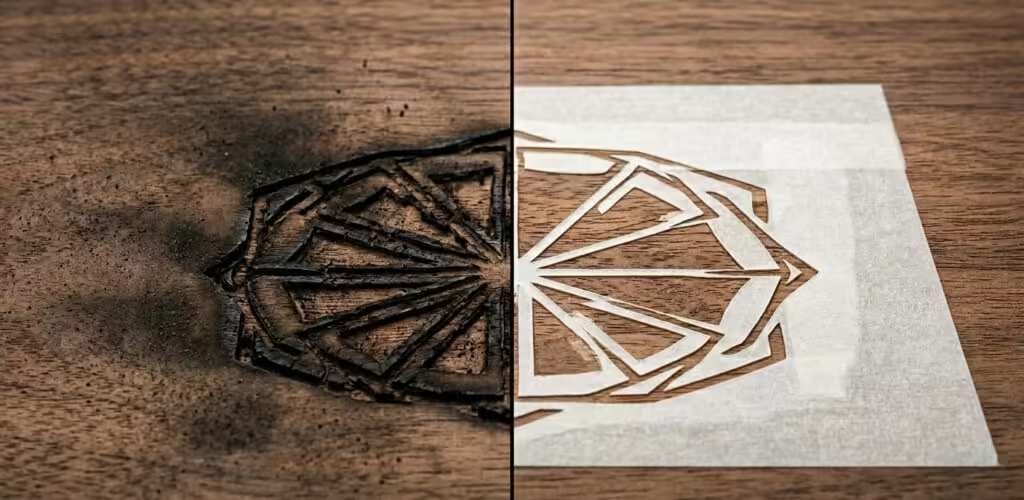
I. Marques de brûlure et carbonisation de surface
1. Identifier le problème
Pourquoi le laser laisse-t-il des halos jaunes peu esthétiques ou des bords profondément carbonisés ? C'est une plainte fréquente lors du traitement de substrats organiques comme le bois de cerisier, le cuir ou certains polymères.
2. Décrire le problème
Le brûlage se manifeste par un “ halo de fumée ” ou un “ brunissement des bords ” lorsque le laser s'attarde trop longtemps, provoquant une combustion localisée. Si vous recherchez comment éviter les marques de brûlure sur le bois gravé au laser, vous devez reconnaître qu'il s'agit d'un échec de gestion thermique.
3. Résoudre le problème
La solution immédiate implique une optimisation ciblée des paramètres de la graveuse laser.
- Augmenter la vitesse Réduire le temps de séjour évite que la chaleur ne s'accumule dans la saignée.
- Ajustement de la fréquence Pour les lasers CO2, réduire les impulsions par pouce (PPI) diminue l'énergie totale délivrée par millimètre.
- Pression d'alimentation en air : Augmenter la pression PSI de votre assistance pneumatique dissipe les vapeurs inflammables avant leur ignition.
4. Comment l'éviter
La norme de référence de l'industrie pour la prévention est l'application de ruban de masquage à faible adhérence. En recouvrant la surface du matériau, la fumée se dépose sur le ruban plutôt que sur la pièce. La résolution efficace des problèmes de gravure laser commence par ces simples barrières physiques.
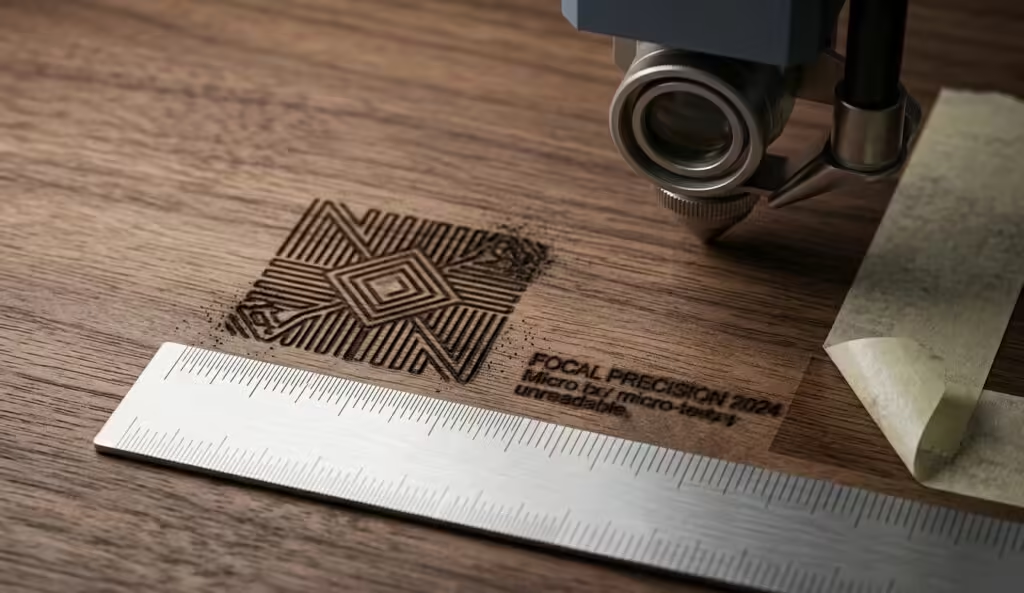
II. Bords Flous et Détails Perdus
1. Identifier le problème
Pourquoi les ridules paraissent-elles “ grosses ”, et pourquoi les petits caractères sont-ils illisibles ?
2. Décrire le problème
Le flou indique généralement une divergence de faisceau ou une vibration mécanique. Au lieu d'un point d'énergie focalisé, le faisceau frappe le matériau sous forme de cercle diffus. Ce manque de netteté est une cible principale pour toute routine de dépannage de gravure laser.
3. Résoudre le problème
La solution pour corriger la gravure laser floue et la profondeur incohérente commence par l'optique.
- Vérification de mise au point : Utilisez une jauge de pas physique pour vous assurer que la distance entre l'objectif et le matériau est exactement au point focal.
- Intégrité de la lentille : Inspectez la lentille focale pour détecter toute opacité. Même une petite trace de résine peut disperser le faisceau.
- Décalage de numérisation : Assurez-vous que le décalage de votre logiciel est calibré de manière à ce que le laser tire à la même position exacte lors des deux mouvements sur l'axe X.
4. Comment l'éviter
Standardiser un “ test de focalisation dorée ” au début de chaque quart de travail. Le dépannage professionnel de la gravure laser repose sur la vérification du point idéal pour chaque lentille spécifique grâce à un test en rampe verticale.
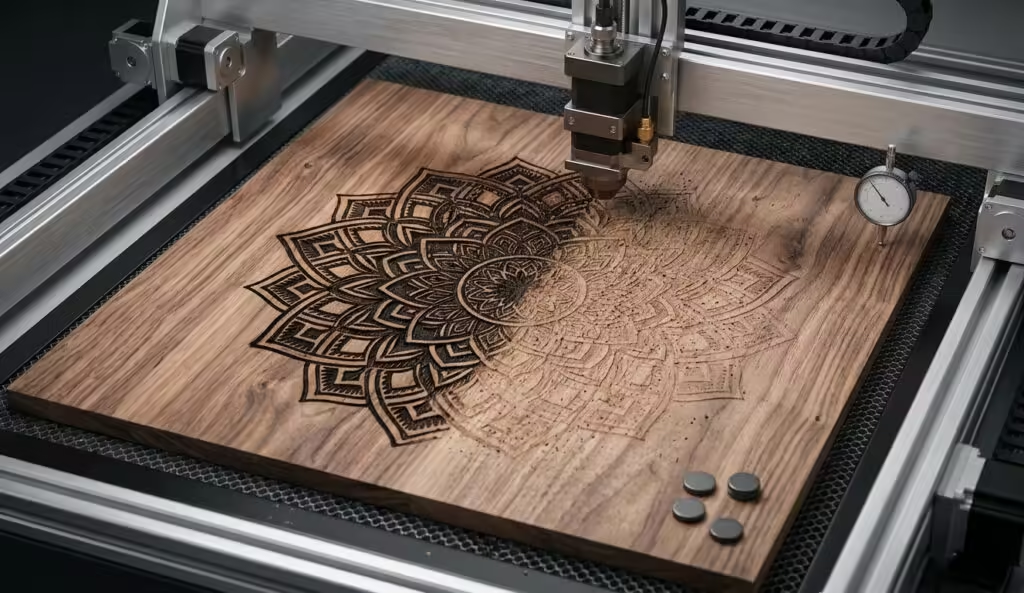
III. Profondeur incohérente
1. Identifier le problème
Pourquoi la gravure est-elle profonde sur le côté gauche de la table, mais à peine visible sur le côté droit ?
2. Décrire le problème
Une profondeur inconsistante est souvent un symptôme d'un plateau de travail non nivelé ou d'une déformation du matériau. Étant donné que le faisceau laser a la forme d'un sablier, le fait de sortir ne serait-ce que de 2 mm de la zone de mise au point modifie la densité d'énergie. L'ajustement de la mise au point du laser pour des surfaces de matériaux inégales est une compétence essentielle ici.
3. Résoudre le problème
La résolution complète des problèmes de gravure laser liés aux problèmes de profondeur nécessite la mise à niveau du plateau.
- Nivellement du plateau Utilisez un comparateur pour vous assurer que le lit nid d'abeille est parallèle au portique.
- Aplatissement du matériau : Utilisez des aimants ou des tables aspirantes pour redresser le contreplaqué déformé.
- Focus Dynamique : Utiliser une tête laser 3D pour des pièces irrégulières afin de maintenir une taille de spot constante.
4. Comment l'éviter
Standardisez votre sourcing de matériaux pour prévenir les variations de densité. Le dépannage proactif de la gravure laser inclut l'inspection préalable des matériaux pour les vides de colle internes qui absorbent l'énergie laser différemment.
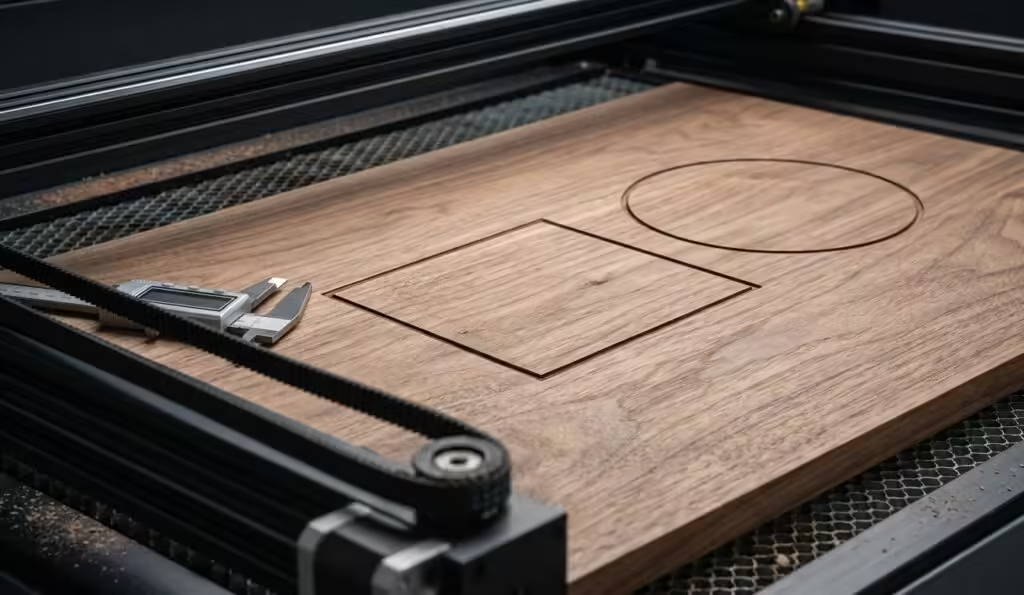
IV. Distorsion Géométrique
1. Identifier le problème
Pourquoi un cercle parfait ressemble-t-il à un ovale, ou un carré sort-il comme un losange ?
2. Décrire le problème
Il s'agit d'un échec de synchronisation mécanique. Lorsque les axes X et Y ne sont pas parfaitement perpendiculaires, ou si une courroie patine, la géométrie échoue. La correction de la distorsion géométrique dans le marquage laser nécessite un audit matériel.
3. Résoudre le problème
Dans le cadre de votre dépannage de gravure laser, vérifiez ce qui suit :
- Tension de la courroie : Un test de “corde” sur les courroies de distribution devrait révéler une tension ferme.
- Audit des vis de réglage : Vérifiez les vis de serrage sur les poulies du moteur ; tout jeu ici entraîne des erreurs massives.
- Étalonnage de la perpendicularité : Exécutez un grand test en “ L ” (500 mm X 500 mm) et mesurez l'hypoténuse pour vous assurer que le portique est d'équerre.
4. Comment l'éviter
Les vérifications de lubrification et de tension doivent faire partie d'un journal de maintenance préventive hebdomadaire. La plupart des problèmes de dépannage de gravure laser concernant la géométrie sont résolus en resserrant simplement le matériel desserré.
Référence technique : Matrice des paramètres pour le contrôle qualité
| Symptôme | Variable principale à ajuster | Action secondaire | Bénéfice résultant |
| Carbonisation excessive | Augmenter la vitesse(10\text(%}-20\text(%}) | Fréquence Plus Basse (Hz/PPI) | Zone de chaleur réduite |
| Détails flous | Nettoyer/Remplacer l'objectif | Recalibrer la hauteur focale | Bords plus nets |
| Profondeur incohérente | Niveau Lit de Travail | Utiliser Table aspirante | Énergie uniforme |
| Surfaces tachées | Augmenter la pression de l'assistance à l'air | Appliquer du ruban de masquage | Empêche le dépôt de résine |
| Formes losanges | Tension de courroies X/Y | Vérifier les vis de serrage de la poulie | Précision de positionnement |
V. Conformité, Sécurité et Autorité
Dans un environnement B2B, le dépannage de la gravure au laser doit être effectué conformément aux normes de sécurité internationales. Selon CEI 60825-1 (Sécurité des produits laser), le maintien de l'intégrité du boîtier est primordial. En outre, pour le traitement des polymères, le respect de la norme ISO 15012-4 concernant l'extraction des fumées est une exigence réglementaire pour prévenir l'inhalation de COV toxiques.
Le dépannage avancé de la gravure laser nécessite souvent de consulter les données du profil du faisceau du fabricant pour s'assurer que le facteur M² n'a pas dégradé avec le temps.
VI. Le rôle de la maintenance dans la qualité
Un contrôle qualité de gravure laser constant est impossible sans un trajet optique propre. La poussière sur un miroir ne fait pas que bloquer la lumière ; elle absorbe la chaleur et peut finir par fissurer le substrat. Par conséquent, le dépannage de gravure laser devrait toujours commencer par une inspection physique des miroirs et de la lentille de focalisation.
Lors de l'optimisation des paramètres du graveur laser, enregistrez toujours votre “ligne de base de réussite”. Cette ligne de base vous permet de revenir à des paramètres connus comme étant bons si vos efforts actuels de dépannage de la gravure laser entraînent des rendements décroissants.
Pensées finales sur Gravure laser Contrôle qualité
La maîtrise du dépannage de la gravure laser est le passage d'un opérateur à un technicien expert. En suivant cette boucle systématique, vous garantissez que votre production reste efficace et que votre taux de rebut reste proche de zéro. Privilégiez toujours l'optimisation des paramètres du graveur laser comme première ligne de défense contre les problèmes de qualité.
FAQ
La température de la lentille affecte-t-elle la qualité de la gravure ?
Oui. Les lentilles surchauffées subissent un “ effet de lentille thermique ”, déplaçant le point focal. La résolution cohérente des problèmes de gravure laser comprend la vérification de la température de votre refroidisseur.
À quelle fréquence dois-je vérifier mes optiques ?
Dans les environnements à forte fumée, inspectez les lentilles toutes les 4 à 8 heures.
Pourquoi mon laser perd-il de la puissance en cours de travail ?
Cela indique souvent un tube de verre DC défaillant ou une alimentation électrique en surchauffe. Un dépannage immédiat de la gravure laser sur la boucle de refroidissement est requis.