
Mastering CO2 Laser Settings: A Practical Guide for Wood, Acrylic & Leather
For laser operators and manufacturing workshops, achieving the perfect balance of power and speed is more than a technical requirement—it is a craft. Finding the ideal CO2 Laser Settings is essential to transforming a raw sheet of material into a professional-grade product. Whether you are running a high-volume production line or working on bespoke architectural models, the science of laser-material interaction dictates your final result.
This guide focuses on the three most common non-metal materials: wood, acrylic, and leather. By understanding the physics behind the beam, you can move away from guesswork and toward a repeatable, data-driven workflow.
Table of Contents
The Physics of the Beam: Why Settings Matter
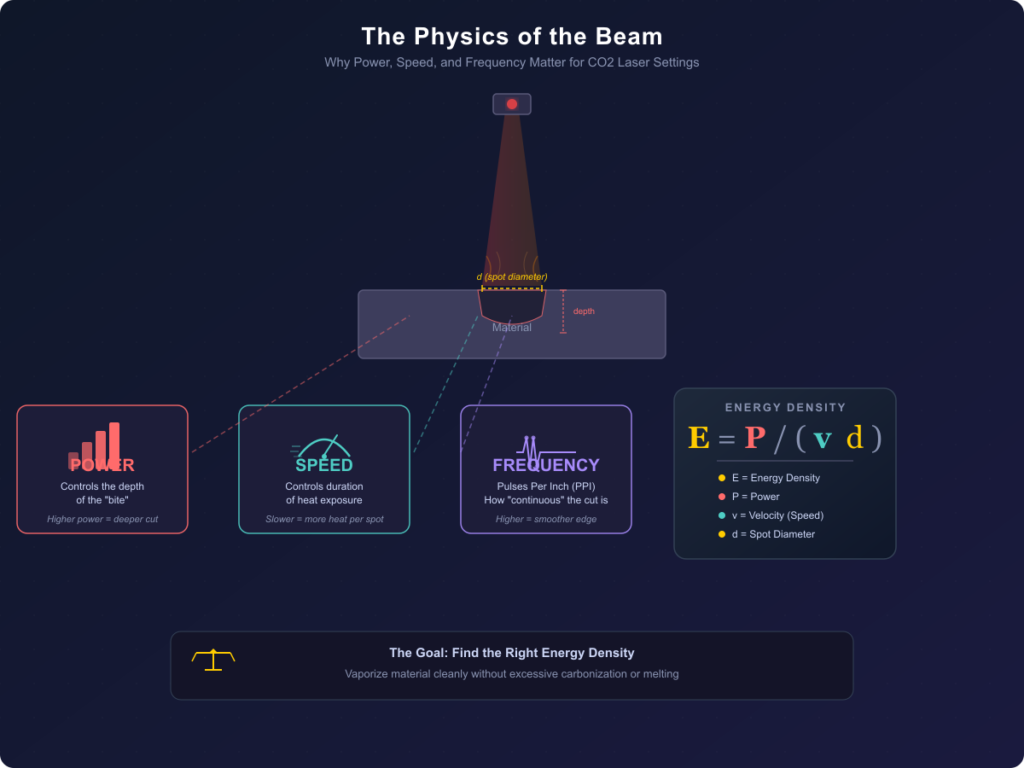
Before diving into material specifics, we must address the fundamental variables: Power, Speed, and Frequency. These three pillars constitute your CO2 Laser Settings. Power determines the depth of the “bite,” Speed controls the duration of heat exposure, and Frequency (or PPI/Pulses Per Inch) determines how “continuous” the cut appears.
The relationship can be defined by the Energy Density formula:
Where E is energy density, P is power, is velocity (speed), and d is the spot diameter.Refining your CO2 Laser Settings is essentially an exercise in managing this energy density toensure the material is vaporized without causing excessive carbonization or melting.
Wood: Achieving Clean Cuts and Natural Textures
Wood is perhaps the most versatile material, but its organic nature makes adjusting CO2 Laser Settings for different wood types a challenge. The density and moisture content of the timber significantly affect how the beam interacts with the lignin and cellulose fibers.
Wood Engraving and MDF vs Plywood
When determining CO2 laser settings for wood engraving, you must account for the wood’s grain. Hardwoods like Walnut or Cherry require higher power to achieve deep contrast, whereas softwoods like Pine can char easily if the speed is too low.
There is also a distinct difference when comparing CO2 laser settings for MDF vs Plywood. MDF is a homogenous material with a high glue content, meaning it cuts very consistently but produces more smoke. Plywood, however, has alternating grain directions and glue layers that can cause “stalling” of the beam if the power is not sufficient to penetrate the adhesive.
Solving the Burn Mark Issue
One of the most frequent questions from operators is how to avoid burn marks on wood laser engraving. The answer lies in the synergy between speed and air assist. By increasing the speed and utilizing a high-pressure air assist, you can “blow” the smoke and debris away before they settle on the surface. Understanding the impact of CO2 Laser Settings on grain orientation will also help you determine whether to engrave with or across the grain for the cleanest finish.
Acrylic: The Quest for Optical Clarity
Acrylic (PMMA) is a favorite for signage and awards because of its ability to achieve a “polished” edge directly from the machine. However, mastering CO2 Laser Settings for clear polymers requires a different mindset than wood.
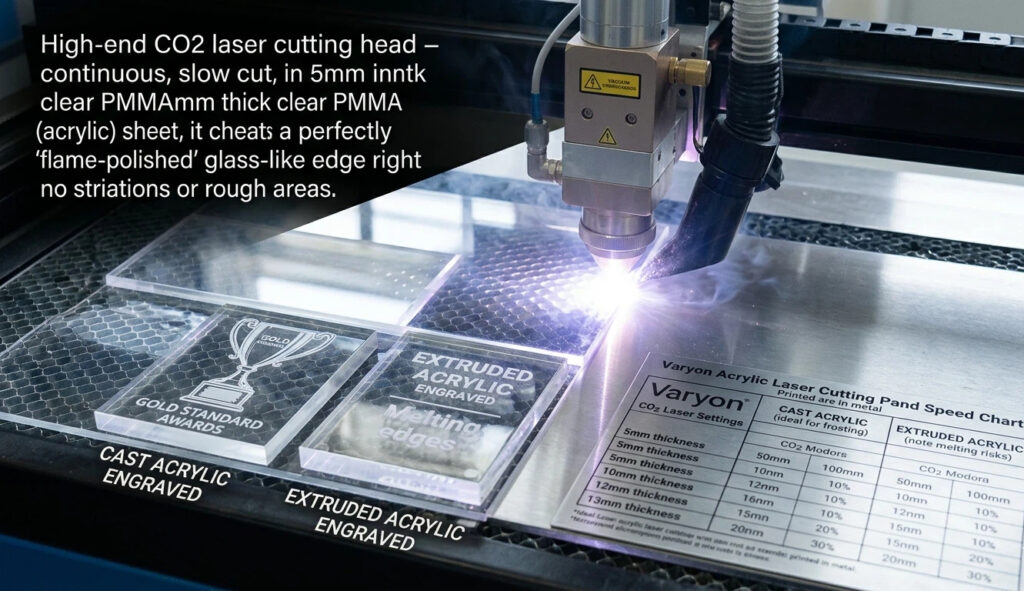
Achieving the Flame-Polished Edge
The secret to achieving flame-polished edges on acrylic is a slow, steady cut with a high-frequency pulse. This allows the edges of the cut to momentarily melt and re-solidify into a smooth, glass-like surface. For 5mm acrylic, you typically want a slower speed and a high power output, whereas engraving requires a very high speed to prevent the surface from melting into a “goopy” mess.
A reliable Acrylic laser cutting power and speed chart will distinguish between Cast and Extruded acrylic. Cast acrylic turns a beautiful “frosted” white when engraved, making it the gold standard for high-end awards. Extruded acrylic, while cheaper, tends to melt rather than frost, requiring very specific CO2 Laser Settings to avoid gummy edges.
Leather: Precision and Detail
Leather is a delicate material that reacts quickly to heat. Because it is a protein-based fiber, the delicate nature of CO2 Laser Settings on hides cannot be overstated. Too much heat will not only burn the leather but also cause it to shrink or warp.
Depth Control and Safety
For those creating brand identities, best laser settings for leather patches usually involve a low-power, high-speed approach. This allows for a surface etch that changes the color without compromising the leather’s structural integrity. CO2 laser engraving depth control for leather is vital; if you cut too deep, the leather will become brittle at the edges.
Fine-tuning CO2 Laser Settings for intricate etching is also a matter of safety. Chrome-tanned leather can release toxic fumes when laser-cut. Always ensure you are working with vegetable-tanned leather or that your exhaust system is industrial-grade.
Starting Point: The Master Parameter Table
The following table provides a summary of starting CO2 Laser Settings for a standard 60W and 100W machine. Note that these are baseline values; a “Power Scale Test” should always be performed on a scrap piece first.
| Material | Type | Power (60W) | Speed (60W) | Power (100W) | Speed (100W) | Note |
| Plywood | 3mm Cut | 60-70% | 15-20mm/s | 45-55% | 25-30mm/s | Use Air Assist |
| MDF | 5mm Cut | 80-90% | 8-10mm/s | 60-70% | 15-18mm/s | High Smoke |
| Acrylic | 5mm Cut | 90% | 5-8mm/s | 75% | 10-12mm/s | Flame Edge |
| Leather | Engrave | 15-20% | 300mm/s | 10-15% | 400mm/s | Veg-Tanned only |
| Wood | Engrave | 25-30% | 350mm/s | 20-25% | 450mm/s | Masking suggested |
Technical Synergy: Hardware and Air Assist
Your machine’s hardware stability affects your CO2 Laser Settings more than you might realize. A laser tube with a stable TEM00 beam mode (a Gaussian distribution of light) will produce a much finer spot size, allowing you to use less power for the same depth of cut.
Furthermore, optimal air assist settings for CO2 laser cutting are the unsung heroes of quality. For wood, high-pressure air prevents combustion. For acrylic, a gentle “whisper” of air is often better, as high pressure can create ripples in the melted edge before it sets. When considering CO2 laser power settings for 60W vs 100W, remember that the 100W tube has a larger minimum trigger power, making it less suitable for very delicate engravings on thin paper or light leather.
Conclusion
The journey to optimize your CO2 Laser Settings for every project is one of continuous testing. While charts and guides provide a necessary foundation, the unique characteristics of each batch of wood or leather will require minor adjustments. By focusing on the interplay between energy density and material properties, you can ensure that your CO2 laser machine remains a precision tool rather than a blunt instrument.
Stay focused on the data, keep your optics clean, and always run a test strip. With these practices, professional-grade results will become the standard for your workshop.
FAQ
Why is my wood engraving turning black?
Your speed is too low or your power is too high. Increase your speed to reduce the “dwell time” of the beam on the material.
How do I get a clear edge on acrylic?
Lower your speed and ensure your frequency (Hz) is set high. Also, slightly reduce the air assist pressure.
Can I cut leather with a 100W laser?
Yes, but since 100W is powerful, use a very high speed and the lowest stable power percentage (usually 10-12%) to avoid burning.
Does lens focal length affect my settings?
Absolutely. A shorter lens (1.5″) is better for fine engraving, while a longer lens (2.5″ or 4″) is better for cutting thick materials like 10mm acrylic.