

Laser Welding Problems: 9 Defects Killing Your Weld Quality (And How to Fix Them)
When you transition a production line to laser technology, the expectation is speed and precision. But when parts start failing visual inspections or leak tests, you realize that dialing in the machine is not just pushing a button. Laser welding problems usually stem from a mismatch between your beam parameters, the shielding gas, and the material condition. If you are dealing with porosity, cracking, or excessive spatter, randomly adjusting the wattage won’t help.
جدول المحتويات
Why Do Laser Welding Problems Happen?
Unlike traditional TIG or MIG, laser welding relies on extreme energy density to create a “keyhole” (a cavity of vaporized metal). The stability of this keyhole dictates your weld quality. If your travel speed is too fast, the keyhole collapses. If your focal point is off by even a millimeter, you lose penetration. Every defect is a physical symptom of an unstable keyhole, improper shielding, or contaminated base metal.
Troubleshooting 9 Common Laser Welding Problems
1.Why is there porosity in my laser weld?
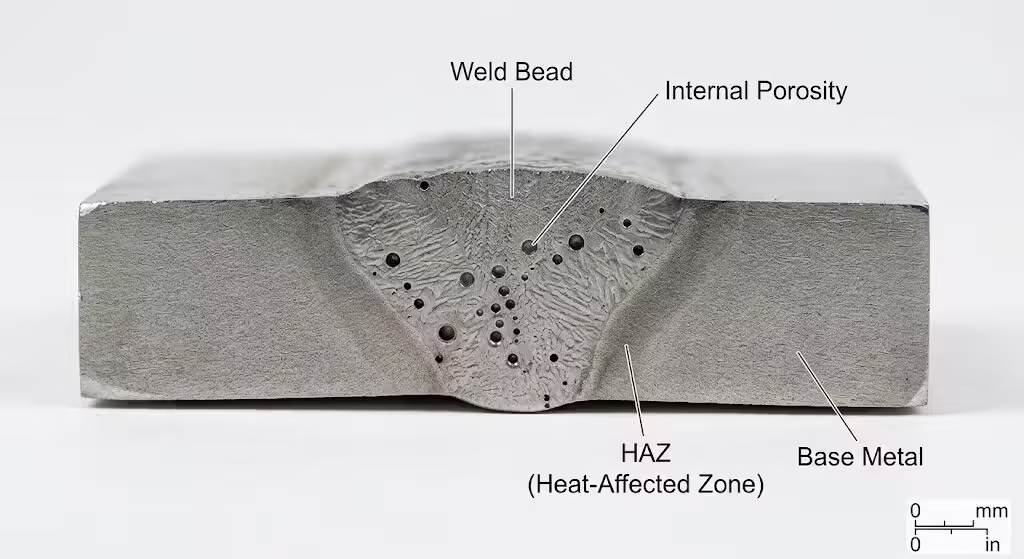
Porosity (tiny holes or gas pockets inside the weld bead) is the most frequent reason parts fail pressure tests. In keyhole welding, metal vapor and shielding gas can get trapped in the molten pool if it freezes too quickly. It also happens when oil, rust, or zinc coatings vaporize instantly upon laser contact.
How to fix it:
- Clean the joint: Remove all cutting oils and oxides. If you are welding galvanized steel, you must leave a small gap (around 0.1mm) to allow zinc vapor to escape.
- Adjust gas flow: Too much shielding gas creates turbulence, pulling atmospheric oxygen into the pool. Dial it back.
- Ramp down power: According to The Welding Institute (TWI)’s technical breakdown on laser weld defects, implementing a controlled power ramp-down at the end of the weld allows the keyhole to close gradually, preventing end-crater porosity.
2.What causes hot cracking during solidification?
You finish a weld, it looks perfect, but a hairline crack runs right down the center of the bead. This is hot cracking (or solidification cracking). It happens because the weld pool cools and shrinks too violently, creating internal stress that tears the metal apart. It is highly dependent on the metallurgy of the parts, especially in 6000-series aluminum alloys or high-carbon steels.
How to fix it:
- Change the filler wire: If welding 6000-series aluminum, introduce a 4000-series filler wire (like 4043) to add silicon, which lowers the melting point and increases crack resistance.
- Broaden the beam: Defocus the laser slightly (move the focal point up). A wider beam creates a wider weld pool, slowing down the cooling rate.
- Preheating: For high-carbon steels, preheat the material to slow the thermal shock. Detailed metallurgical studies, such as those found in MDPI’s materials research on laser weld cracking, show that controlling the temperature gradient is the primary defense against center-line tearing.
3.How do you reduce laser weld spatter?
Spatter happens when the metal vapor pressure inside the keyhole ejects molten droplets onto the surrounding surface. It requires costly post-weld grinding and means you are losing material from the joint itself.
How to fix it:
- Check the focal position: If your focal point is set too deep inside the material, vapor struggles to escape and blows metal out. Raise the focal point toward the surface.
- Angle the laser: Never weld perfectly perpendicular (90 degrees). Angle the welding head 10 to 15 degrees trailing or pushing.
- Adjust travel speed: If you move too slowly, the weld pool gets too large and unstable. Increase your travel speed slightly. For a deeper dive into controlling vapor dynamics, The Fabricator’s guide on laser welding spatter prevention provides excellent case studies on focal adjustments.
4.Why am I getting incomplete penetration?
If your weld looks like a surface scratch and fails a pull test, you lack penetration. The laser energy is not reaching the root of the joint.
How to fix it:
- Increase peak power: If your machine allows it, bump up the wattage.
- Slow down: Give the laser time to melt deeper into the Z-axis.
- Verify focal spot: Make sure the laser is focused exactly on the surface (or slightly below it for deep keyhole mode). A defocused beam spreads the energy too thin.
5.What leads to undercutting at the weld edges?
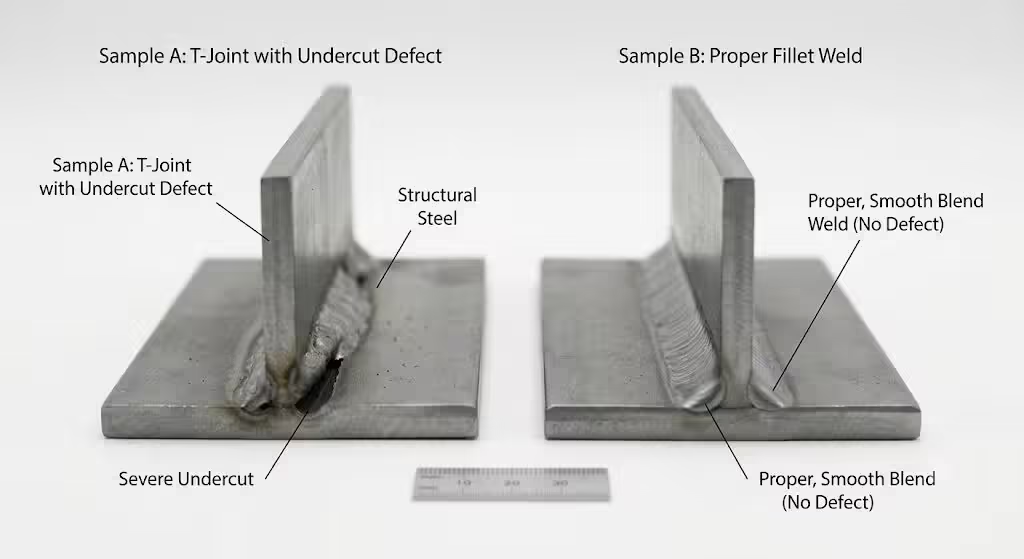
Undercut looks like a melted groove along the edges of the weld bead where the base metal has melted away but hasn’t been filled back in. This creates a severe stress concentration point that will fail under fatigue.
How to fix it:
- Slow your travel speed: You are moving faster than the molten metal can flow back and fill the edges.
- Check wire feed: If you are using cold wire feed, increase the wire feed rate to ensure enough material is being deposited to fill the groove.
6.How to stop burn-through on thin metal sheets?
When welding sheet metal (under 2mm), you might suddenly blast a hole straight through the material. Burn-through happens when heat input exceeds the thermal mass of the parts.
How to fix it:
- Switch to pulsed mode: Instead of continuous wave (CW), use a pulsed laser setting. This gives the material a fraction of a millisecond to cool between laser hits, drastically reducing average heat input.
- Tighten the gap: If your fit-up has gaps, the laser will burn the edges instead of bridging them. Ensure zero-gap fit-up with proper clamping. As discussed in IPG Photonics’ engineering blog on optimizing parameters, precise clamping is non-negotiable for thin-gauge sheet metal.
7.What is weld humping and how do you smooth it?
Humping is when the weld bead looks like a series of uneven hills rather than a smooth, continuous line. It usually occurs during very high-speed welding. The molten metal is pushed to the back of the pool and solidifies before it can flatten out.
How to fix it:
- Decrease travel speed: This is the most direct fix. Give the surface tension of the molten pool time to level out before it freezes.
- Adjust shielding gas angle: Sometimes, a high-pressure gas nozzle blowing directly backward pushes the molten metal into humps. Adjust the nozzle angle.
8.Why is the joint suffering from lack of fusion?
Lack of fusion means the weld metal did not bond with the base material on one or both sides of the joint. It is a deadly defect because it can hide under a decent-looking surface.
How to fix it:
- Re-align the beam: The laser is missing the seam. Double-check your optical alignment and tracking systems. If the beam is hitting 0.5mm to the left, only one plate will melt.
- Check the gap width: If the gap is wider than the laser spot size, the beam will pass right through or only melt one edge. Real-world operators frequently flag fit-up issues as the root cause; in community discussions, such as this Reddit r/Welding thread on laser porosity and fusion issues, machinists constantly reiterate that laser welding cannot bridge poor joint fit-ups like MIG can.
9.Why is the weld turning black (Oxidation)?
A clean laser weld on stainless steel or titanium should be silver or straw-colored. If it turns dark blue, brown, or black with a crusty surface, the metal has oxidized because atmospheric oxygen hit it while it was still hot.
How to fix it:
- Check gas coverage: Ensure your Argon or Nitrogen cylinder is not empty and check for leaks in the gas line.
- Increase trailing shield: The weld might be protected while under the laser, but oxidizing immediately after the nozzle moves away. Add a trailing gas shield to protect the metal until it cools below its oxidation temperature.
Quick Parameter Checklist to Avoid Weld Defects
Before striking an arc on a production run, run through this baseline checklist to prevent the defects listed above:
1.Focal Offset: Is it set to surface (0), positive (defocused), or negative (deep penetration)?
2.Part Cleanliness: Have all oils, rust preventatives, and oxides been wiped off the seam?
3.Clamping: Is the gap tolerance within 10% of the material thickness?
4.Gas Flow: Is the flow rate set between 10-20 L/min (avoiding turbulence)?
5.Alignment: Is the beam centered exactly over the joint line?
Final Word on Troubleshooting
Identifying the root cause of these defects requires a systematic approach. Do not change the power, speed, and focal point all at once. Change one variable, run a test coupon, and inspect the result. By understanding the physics behind laser welding problems, you stop guessing and start setting up repeatable, high-yield production runs.
التعليمات
Can I fix a laser weld with incomplete penetration by welding over it again?
Yes, but it is not ideal. A second pass will increase the overall heat input, which can lead to distortion or alter the metallurgical properties of the joint. It is better to increase power or slow the travel speed on a scrap piece to find the correct parameters first.
Why does my pulsed laser weld have a scalloped edge?
A scalloped edge means your pulse frequency is too low compared to your travel speed. The laser pulses are not overlapping enough. You need to either increase the pulse frequency (Hz) or slow down your travel speed to ensure at least a 50% overlap between laser spots.
Is Argon or Nitrogen better for preventing oxidation?
For most carbon steels and aluminum, Argon provides the best protection and keyhole stability. Nitrogen is often used for stainless steel because it can improve the mechanical properties of the weld and is cheaper, but it should never be used on titanium, as it causes severe embrittlement.