
Mastering the Laser Power Scale: A Guide to Perfecting Engraving Settings
If you have ever spent hours scrubbing charred edges off a piece of plywood or stared in frustration at a “ghosted” image on acrylic, you know the struggle. A Laser Engraving Machine is a precision instrument, but without the right settings, it is just an expensive heater. The difference between a hobbyist and a professional often comes down to one technical discipline: mastering the Laser Power Scale.
In this guide, we will break down why calibration is non-negotiable and how a systematic Laser Power Scale Test can save you hundreds of dollars in wasted materials.
Оглавление
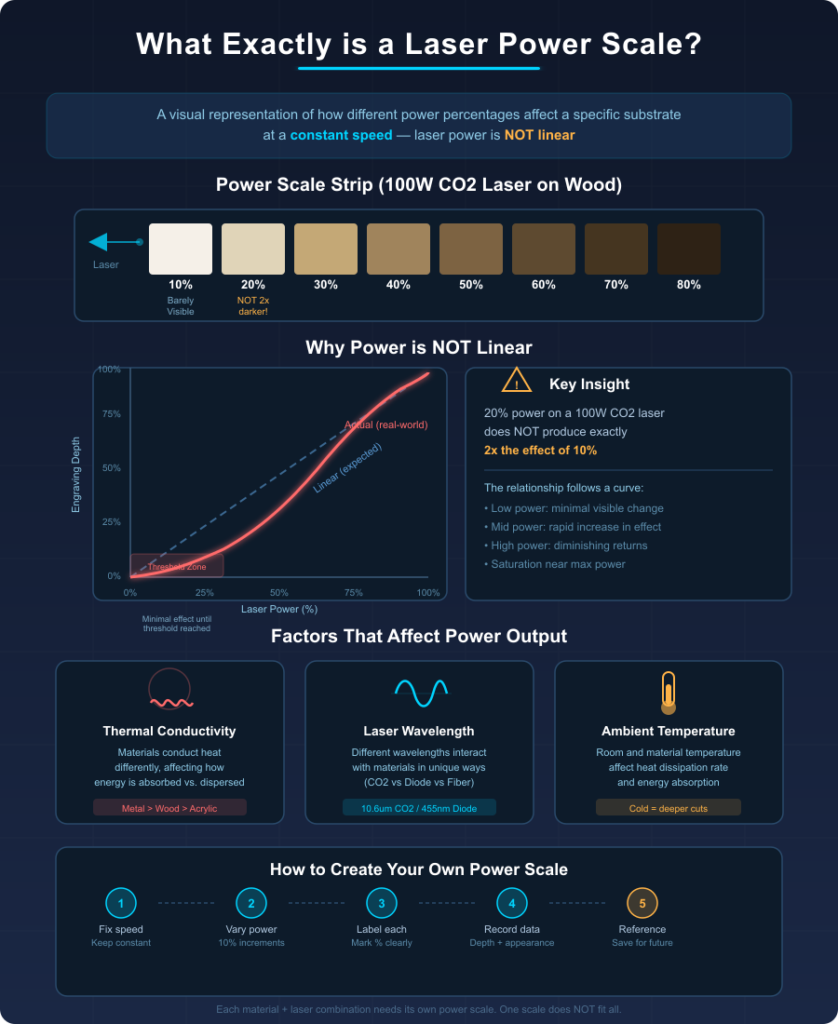
What Exactly is a Laser Power Scale?
In simple terms, a Laser Power Scale is a visual representation of how different power percentages affect a specific substrate at a constant speed. Laser power is not linear in its effect; 20% power on a 100W CO2 laser won’t always look exactly twice as dark as 10%.
Factors like the material’s thermal conductivity, the laser’s wavelength, and the ambient temperature all play a role. By creating a controlled Laser Power Scale, you create a “map” that tells you exactly where the “sweet spot” is for depth, contrast, and clarity.
The Logic of Laser Power vs Speed Test
To understand power, you must understand time. A laser power vs speed test is essentially a matrix. If the laser moves faster, it spends less time on a single spot, requiring more power to achieve the same depth. Conversely, slow speeds with high power often lead to “over-charring” or melting.
The goal of your calibration is to find the maximum speed possible that still delivers the desired aesthetic result. This increases your production efficiency and reduces the wear and tear on your laser tube. For more on the physics of laser-material interaction, the University of Cambridge’s Institute for Manufacturing provides excellent resources on laser processing found here.
How to Create a Laser Power Scale Test Grid
Don’t rely on the generic “suggested settings” that came in your machine’s manual. Every tube ages, and every batch of wood has different moisture content. You need to know how to create a laser power scale test grid specifically for your current setup.
Most professionals use software like LightBurn to generate a “Material Test” tool. The grid usually ranges from 10% to 100% power on one axis and 100mm/s to 500mm/s on the other.
Steps for a Successful Test:
1.Select your material: Use a scrap piece of the exact material you plan to use for your final project.
2.Define the range: If you are using a 50W laser on paper, you don’t need 100% power. Set a logical range (e.g., 5% to 30%).
3.Run the file: Watch the process. If you see excessive flaming, stop and adjust your air assist.
4.Label and Store: This becomes your material test card for laser reference. Keep it in a physical binder or a “spec board” in your shop.
The Importance of the Material Test Card for Laser
Think of the material test card for laser as your shop’s “color palette.” When a client asks for an engraving on cherry wood, you shouldn’t have to guess the settings. You pull out your card, look at the Laser Power Scale, and pick the row that shows the cleanest, deepest engrave without scorched halos.
Professional shops often have dozens of these cards hanging on the wall. They represent the cumulative data of their Laser Engraving Machine’s performance across different brands of plywood, leather, and powder-coated metals.
Recommended Baseline: Laser Engraving Power Settings Chart
While every machine is different, having a starting point helps. Below is a generalized laser engraving power settings chart for a standard 60W CO2 laser. Note: Always perform your own Laser Power Scale Test before starting a large production run.
| Material | Speed (mm/s) | Power (%) | Goal |
| Birch Plywood (3mm) | 350 | 25 – 40 | Dark brown, no char |
| Clear Acrylic (5mm) | 250 | 15 – 25 | Frosted white finish |
| Anodized Aluminum | 150 | 30 – 50 | Bright white contrast |
| Natural Leather | 400 | 10 – 18 | Crisp, clean smell |
| Glass (Dish soap method) | 200 | 20 – 30 | Consistent frosting |
Laser Power Calibration for CO2 vs Fiber Lasers
It is a common mistake to assume that a Laser Power Scale works the same way on every machine. Laser power calibration for CO2 vs Fiber lasers involves very different physics.
- CO2 Lasers: These work best on organic materials (wood, leather, acrylic). The power scale focuses on heat management to prevent burning.
- Fiber Lasers: These are designed for metals and plastics. Their “power scale” often involves “frequency” (kHz) settings which determine how the laser pulses. A fiber laser can actually change the color of metal (annealing) based on the specific Laser Power Scale settings used.
For technical standards on laser safety and classification during these tests, the Laser Institute of America (LIA) is the global authority. You can view their safety standards here.
Finding the Best Laser Power Settings for Plywood Engraving
Plywood is notoriously difficult because of the glue layers. The best laser power settings for plywood engraving are those that penetrate the top veneer without boiling the glue underneath. If the glue boils, it creates sticky, yellow resin stains that are nearly impossible to remove.
To avoid this, use a higher speed and multiple passes if necessary, rather than one high-power pass. Your Laser Power Scale will show you that at a certain point, increasing power doesn’t make the wood darker—it just makes the hole wider (increasing the “kerf”).
Troubleshooting Your Laser Power Scale Results
If your Laser Power Scale Test looks inconsistent (e.g., some squares are darker on the left than the right), you may have a mechanical issue:
1.Dirty Mirrors/Lens: The most common cause of power loss.
2.Out of Focus: Even a 2mm difference in height can ruin your Laser Power Scale.
3.Tube Aging: If you find you need 10% more power than you did six months ago, your CO2 tube may be nearing the end of its lifespan.
Conclusion
At the end of the day, the Laser Power Scale is about more than just pretty pictures. It is about repeatability. In a professional B2B environment, a customer expects the 1,000th unit to look exactly like the first.
By systematically running a Laser Power Scale Test for every new batch of material, you position yourself as an expert who values quality over guesswork. Don’t let your Laser Engraving Machine dictate the quality of your work—take control of the power.
ЧАСТО ЗАДАВАЕМЫЕ ВОПРОСЫ
How often should I run a Laser Power Scale Test?
Every time you switch to a new material or a new supplier batch. Even the same wood from the same store can vary in moisture.
Why does my laser power scale look different in summer vs winter?
Air density and humidity affect how the laser beam interacts with the air and the material. High humidity can “dampen” the effective power reaching the substrate.
Can I use the same scale for engraving and cutting?
No. Engraving is about surface reaction; cutting is about full penetration. You need a separate test for “Cut Speed vs Power.”
Is 100% power always bad for the machine?
Most experts recommend staying below 85-90% to extend the life of the laser tube and prevent overheating.
What is the most important part of the Laser Power Scale?
The “Threshold.” Finding the exact percentage where the laser actually begins to mark the material (often called the “firing point”).