
Are Your Laser Engraving Power Settings Killing Your Profit Margins?
Precision in industrial manufacturing is not achieved through trial and error; it is a result of calculated calibration. The core of high-quality marking lies in the precise management of Laser Engraving Power Settings. Whether processing stainless steel or organic polymers, understanding the interplay between energy output and material response is critical for operational efficiency and professional-grade results.
Table of Contents
The Physics of Energy Density
Every laser marking application begins with the concept of Energy Density. This is the amount of power delivered to a specific area over a specific duration. In professional environments, adjusting your Laser Engraving Power Settings is essentially an exercise in managing the Heat Affected Zone (HAZ).
According to technical standards established by the International Society for Optics and Photonics (SPIE), the absorption rate of a material dictates the required energy threshold. If the energy density is too low, the material surface remains unchanged. If it is too high, excessive thermal stress leads to warping or charring, particularly in heat-sensitive substrates.
Pulse Frequency (KHz) and Its Role in Quality
In fiber laser systems, the Pulse Frequency (KHz) is as vital as the wattage. Frequency determines the number of laser pulses per second. High-frequency settings (60–100 KHz) result in a smoother finish with less surface disruption, ideal for medical device marking.
Conversely, lower frequency settings (20–40 KHz) deliver higher peak power per pulse, which is necessary for deep etching in hardened steels. When you refine your Laser Engraving Power Settings, you must balance frequency with speed to ensure overlapping pulses create a continuous, legible mark without degrading the material’s structural integrity.
Mastering the Laser Power and Speed Chart
To streamline production, every facility requires a localized Laser Power and Speed Chart. This technical document serves as the baseline for all operations. The relationship between power and speed is typically inverse: to maintain a consistent depth, an increase in speed must be compensated by a proportional increase in power.
| Material | Laser Type | Power (%) | Speed (mm/s) | Frequency (KHz) | Note |
| Stainless Steel | Fiber | 30-50 | 500-800 | 30 | High Contrast Marking |
| Anodized Aluminum | Fiber | 15-25 | 1500-2000 | 50 | Surface Ablation only |
| Hardwood (Oak) | CO2 | 60-80 | 300-500 | N/A | High Air Assist required |
| Clear Acrylic | CO2 | 20-35 | 400-600 | N/A | Flame-polished edge |
Establishing these Laser Engraving Power Settings ensures repeatability across different shifts and operators.
Material Compatibility Guide: Beyond the Surface
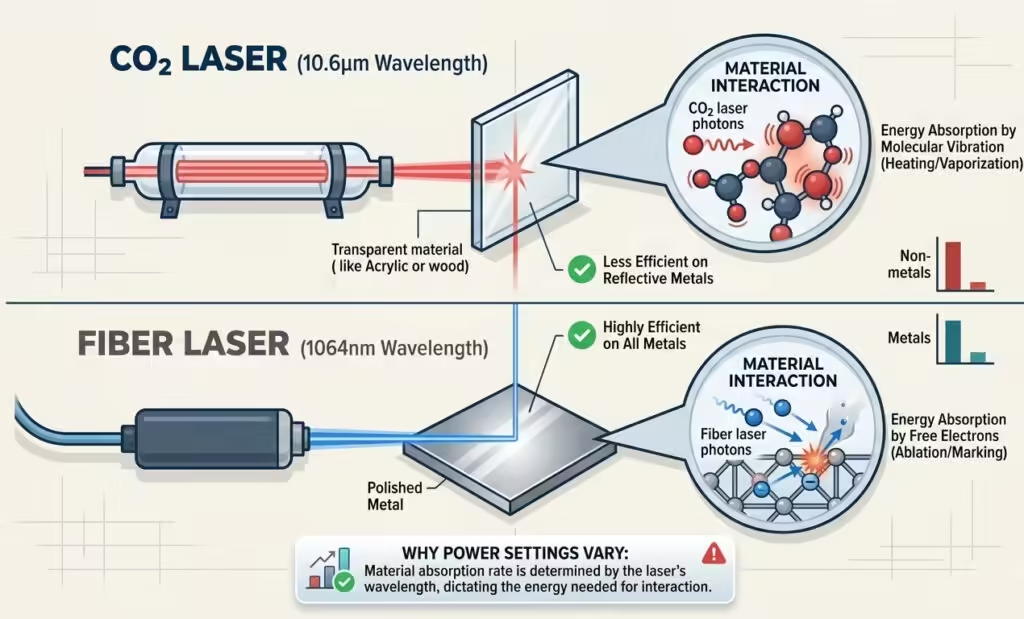
A comprehensive Material Compatibility Guide is essential for identifying how different wavelengths interact with matter. Fiber lasers (1064nm) are exceptionally efficient for metals and certain plastics due to their high absorption rates in these materials. CO2 lasers (10.6μm), however, are the industry standard for non-metallic substrates like wood, glass, and textiles.
When configuring Laser Engraving Power Settings for new alloys, engineers must account for surface reflectivity. Highly reflective metals, such as copper or brass, can cause back-reflections that damage the laser source if the power is not ramped correctly. Using a ramp-up buffer in your software settings is a standard industrial safeguard.
Optimizing Engraving Depth and Contrast
Achieving the perfect balance of Engraving Depth and Contrast is the hallmark of a master technician. In the automotive and aerospace sectors, 2D DataMatrix codes require high contrast for machine readability. This is often achieved through a process called “annealing,” where lower Laser Engraving Power Settings are used at slower speeds to heat the metal to its melting point without removing material, creating a permanent dark oxide layer.
For deep etching, the focus shifts to material removal. This requires multiple passes at high power and moderate speed. Using a cross-hatch filling pattern in your software ensures that the bottom of the etch is flat and free of “stepping” artifacts.
Industrial Applications and Performance
In a high-throughput manufacturing line, Recommended laser engraving settings for industrial marking often prioritize cycle time. However, speed should never compromise the “Permanent Mark” requirement of ISO standards.
Modern fiber lasers allow for high-speed scanning (up to 7000 mm/s), but the Laser Engraving Power Settings must be sufficient to trigger the molecular change in the substrate within that micro-duration.
Why laser power settings vary between CO2 and Fiber lasers
A common technical inquiry in the workshop is Why laser power settings vary between CO2 and Fiber lasers. The answer lies in the Beer-Lambert Law, which relates the attenuation of light to the properties of the material through which the light is traveling.
Fiber lasers produce a much smaller spot size (higher power density) than CO2 lasers. Consequently, a 20W Fiber laser can often engrave metal more effectively than a 100W CO2 laser. Understanding this discrepancy is fundamental when migrating workflows between different machine architectures or optimizing your Laser Engraving Power Settings for multi-machine shops.
How to find the best laser power settings for new materials
When a client introduces a proprietary composite or a new alloy, the technical team must know How to find the best laser power settings for new materials. The most efficient method is the “Power-Speed Matrix Test.”
1.Grid Setup: Create a 10×10 grid in your control software (e.g., LightBurn or EZCAD).
2.Variable Allocation: Assign Power to the X-axis (10% increments) and Speed to the Y-axis.
3.Execution: Run the test on a scrap piece of the target material.
4.Evaluation: Analyze the results for depth, charring, and contrast.
This empirical approach removes the guesswork from Laser Engraving Power Settings and builds a robust internal database.
Optimal speed and power settings for deep laser etching
Deep etching (greater than 0.1mm) in industrial tools requires Optimal speed and power settings for deep laser etching. To prevent the accumulation of slag and carbonization, technicians should utilize high-pressure air assist and a “wobble” function if available.
By modulating the Laser Engraving Power Settings through multiple layers—rather than one high-power blast—the technician maintains control over the verticality of the etch walls.
Universal laser engraving parameter list for stainless steel and wood
While no list is truly “universal” due to variations in laser tube health and optics cleanliness, a Universal laser engraving parameter list for stainless steel and wood provides a necessary starting point.
For 304 Stainless Steel, a 30W Fiber laser typically performs best at 40% power and 600mm/s. For Birch Plywood, a 60W CO2 laser often hits the “sweet spot” at 25% power and 350mm/s. These Laser Engraving Power Settings prevent the most common failure modes: “burning through” on wood and “fading” on steel.

Conclusion: The ROI of Precision
Calibrating your Laser Engraving Power Settings is more than a technical requirement; it is a business strategy. Reducing scrap rates and increasing throughput directly impacts the bottom line. By leveraging a structured Laser Power and Speed Chart and adhering to a rigorous Material Compatibility Guide, industrial facilities can ensure that every mark is a mark of quality.
Technical FAQ
How to find the best laser power settings for new materials?
Run a 10×10 power-speed matrix test. This visualizes the interaction between wattage and velocity, allowing you to identify the optimal balance for contrast and depth without wasting material.
Why do my Laser Engraving Power Settings produce inconsistent results on the same material?
Check for focal drift or lens contamination. Even a 1mm deviation in focus or a speck of dust on the F-theta lens can result in a 30% drop in effective energy density.
Are there recommended laser engraving settings for industrial marking of QR codes?
Yes. Prioritize high contrast over depth. Use a high frequency (80KHz+) and a tighter hatch spacing (0.03mm) to ensure the scanner can distinguish the code’s modules from the background.
Optimal speed and power settings for deep laser etching on aluminum?
Use high power (80%+), moderate speed (300-500mm/s), and low frequency (20KHz). Multiple passes with a slight focus shift between layers will yield the cleanest deep etches.